


Managing the first days
Nowadays a layer flock has a live span of up to 90 weeks. Compared to the production period, the rearing phase represents only a small part of the whole life cycle. Yet it determines to a large extent the success of later egg production. It is therefore of crucial importance to give the birds a good start in this phase of their life.
Good rearing management entails more than just following the Management Guides of the breeding company very strictly. People who work with the animals should be able to judge the behavior and the condition of the flock and make the right conclusions. The eye and the common sense of the pullet rearer are often underestimated or forgotten. even though they are among the most important factors in successful pullet growing.
Preparing the chicken house
Isolation and restricted access to the brooding area are of prime importance for the control and prevention of poultry disease. The all-in all-out rearing programme is recommended as it provides excellent means for isolation. It also allows for proper cleanup in the event of a disease outbreak. Traffic between the rearing area and lay houses should be avoided. Place day-old chicks in houses which are properly cleaned and disinfected only. Make sure that the house is heated up to 36 °C at the moment of chick arrival. Litter should be placed after heating the shed, for instance when the floor has reached the correct temperature. If litter is spread too early, significant differences between floor and room temperature can cause condensation. The litter becomes wet and sticky from beneath.Brooding period
The first week of a pullet’s life can also be described as the brooding period. when chickens hatch, they are coldblooded for about the first 5 days of their life. This means they are unable to maintain their body temperature of 40-41°C on their own and are highly dependent on external heat sources. This is why, during the first phase of life, we have to consider air temperature as one of the most important factors leading to a successful rearing period. It is absolutely necessary to supply the birds with the right temperatures for each period of age. An infrared thermometer for babies is used to easily supervise chick body temperature and adjust the house temperature accordingly. some crucial mistakes with regard to temperature that often occur in the chicken houses:› The reference thermometer is not placed on chick level. One has to be aware that the temperature half a metre above the chick level can be already up to 2 to 3°C warmer.
› Chick behavior is not taken into account. we should not only watch the exact temperature on the thermometer, but also observe the chickens very closely. some flocks feel comfortable at a temperature of 34°C, others need 36°C or more during the first 24 hours. Chicks should be evenly spread in the barn. If they huddle together, they feel too cold. If they spread out their wings and are inactive, they feel too warm.
› Air humidity. Often the house is well prepared concerning target temperature but at the same moment, air humidity is very weak (< 40 %). In order to have a better distribution of heating energy in the whole chicken house and to avoid dehydration of the chicks, air humidity must be at least 60 %. If this is not the case, it is possible that the chicks feel uncomfortable even though the target temperatures are correct. There are easy measures which can be taken to improve air humidity. For instance, moistening the floor and walls where chicks are not present and hanging wet sheets will help to improve air humidity.
› Air drafts in a poultry house may chill the chicks and can result in piling.
Lighting scheme
Besides the temperature, the lighting program is an important tool to give chickens a good start into their life. Young chicks arriving at the rearing farm already have endured a long transport after hatching. Day-old chickens are normally provided with 24 hours of light for the first 2 to 3 days to give them time to recover and to eat and drink ad libitum. “In reality, however, it has been observed that some chicks continue to rest after arrival, while others seek out food or water. Flock activity will therefore always be uneven. During this phase of rearing, attendants find it particularly difficult to accurately assess chick behavior and condition. An intermittent lighting program (see figure 1) can be used during the first 7 to 10 days after hatching. This program divides the day into resting and activity phases. The objective of such a program is to synchronize chick activity. This makes it easier for the staff to assess the condition of the flock more accurately. It also stimulates food and water intake through group behavior.The benefits of using an intermittent lighting program are:
› Chicks rest or sleep at the same time. Chick behavior is synchronized.
Table 1: Recommended particle size distribution of developer and layer feed
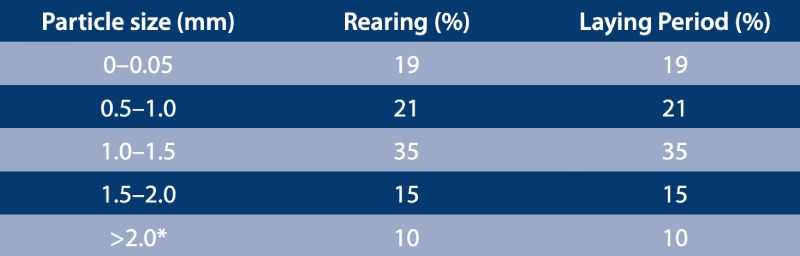
*in the 1st age phase, never exceed 3 mm; in other phases never exceed 5 mm
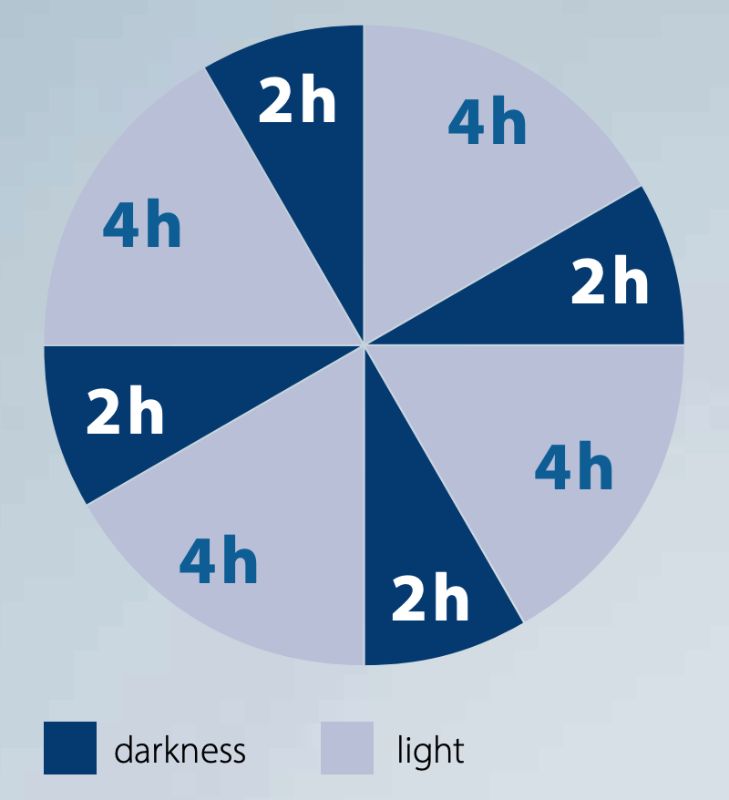
Graph: Intermittent Lighting Program for dayold chicks. This lighting program can be applied during the first 7 to 10 days after hatching
› Weaker chicks are stimulated by stronger ones to be active and ingest feed and water.
› Flock behavior is more uniform, making chick assessment easier.
› Losses in the first week are reduced.
After the intermittent lighting program has been used for about the first 10 days, the pullet rearer can switch over to the normal lighting program which is recommended by the breeding company.
Feed and water
The physiology of day-old chicks makes it possible to transport them over very long distances without feed and water. They are born with a yolk sac, which supplies them with everything they need during the first 48 hours of their life. It also provides them with maternal antibodies which help to develop a certain immunocompetence. However, poultry growers should aim to feed and water day-old chicks as fast as possible to maintain good vitality. As a consequence, they will achieve a low first week mortality. The earlier the chicks are starting to eat, the better they can metabolize the nutrient package of their yolk sac, which lowers the risk of yolk sac infection. supply enough drinker and feeder space. some producers have found that adding electrolytes to the drinking water improves the performance of chicks. This step should be taken after consulting a qualified veterinarian who is familiar with local conditions. Maintaining the right drinking water temperature of 22 to 25°C is crucial in order to have the highest possible water intake from the beginning. It is recommendable to feed best quality mash or crumbled feed during the brooding period. Only unsaturated fatty acids like linoleic acid can be usefully utilized by chicks and should be added to the feed. saturated fatty acids in contrast, will harm the birds and will result in wet and black cloacas. Providing four diets (starter, grower, developer and pre-layer) during the brood and grow period are very adequate for the chicks and pullets. each diet should be supplemented with vitamins and minerals. each diet should be fed until the appropriate target weight (provided by the breeding company) is achieved. Only at that point, the switch to the next diet should be made.Main mistakes which occur in rearing houses:
› Nipple drinkers are placed too high. During the first days, the nipple should be at eye level of the chicks. Reduce the pressure of the water in water lines, so that the day-old chicks easily operate the nipples.
› Too few drinkers and feeders. It is crucial that the birds don’t have to search for water and feed. It is better to place too many drinkers than too few. Birds that do not drink will also eat too little.
› For birds which arrive from the hatchery with their beak treated, open water sources (for instance round drinkers, cups) have to be available.
› Change the water in the round drinkers and flush water pipes regularly. Avoid dirty and contaminated water. Make sure you clean water pipes efficiently during service periods, simultaneously ensuring that no residues of disinfectants remain in the water system and harm the taste of the water.
› Wrong water temperature. Maintain a water temperature between 22 and 25°C. Change the water in round drinkers and flush water pipes regularly. Chicks don’t like to drink very hot water. A good measure is to flush the water pipes during the 2 hours of darkness when an intermittent lighting program is applied.
› Feed and water are placed many hours and sometimes days before chick arrival. This results in very dry feed and too hot water. Both are not appreciated by the birds and will slow down their development. In the worst case scenario this may induce a high first week mortality.
› Pan feeders. They don’t fit the needs of layer type pullets. They hardly run empty once a week. This stimulates selective eating of birds aged over 12 weeks. Therefore, it results in an imbalanced nutrient supply.
› Using different drinker and feeder systems during rearing and production. This is dangerous and contributes to pullets starving out and drying out after transfer. Never use open water sources and chain feeders when you transfer pullets in a production house where only nipple drinkers and pan feeders are installed.
› supply the birds with feed that has the right particle size for each age. Very young birds also don’t like to eat feed that is too fine. (see table 1)
› To change the phase of feeding, the body weight is a more important factor than the age of the flock. If the body weight of a flock is not on target, the feed type should not be changed until the birds have reached their weight.
Weighing of birds
weighing the birds on a regular basis (once per week and directly in the morning when the light goes on) is one of the most important indicators for applying important management tools, such as lighting program and phase feeding, in the correct way. Things which are done wrongly in the field are:› weighing the birds without making conclusions.
› weighing too few birds. It is recommendable to weigh at least 1 % of the flock or at least 100 birds per flock.
› Not weighing birds at all!
Signs of distress
Be alert to distress signals coming from the chicks. React appropriately to the following chick behavior:
› Listless and prostrate chicks indicate excessive heat.
› Loud chirping indicates hunger or cold.
› Grouping (huddling) together indicates excessive cold or draughts.
› Pasted vents which may indicate excessive heat or coldness or feed that contains saturated fatty acids.
Common sense
Pullet rearing sounds easy in management guides. And many people think that, if they only meticulously follow the management guidelines, nothing can go wrong. But there are some measures which cannot be described or explained in a management guide, and these include relying on your own common sense. when entering a pullet barn, every sense like smelling, hearing, feeling and touching should be used. If you have the vague impression that something is wrong, believe your instinct and try to find out what is amiss. even though the climate computer shows optimal conditions, search for the reason why you personally had a bad feeling about the conditions or the behavior of that flock. This little investment of time will pay off and make you more sensitive to the needs of your pullets.In this article only a few measures are described and the main focus is on the first week management of a flock. Be aware that in the critical phase of 4 to 8 weeks, birds have an enormous body weight development. A too high stocking density during that age destroys every flock with respect to average body weight and homogeneity.
Farhad Mozafar