


Breakout analyses are useful hatchery management procedures that provide valuable information by helping to relate
problems to the breeder flock, egg handling procedures and/or the hatchery
There are three different procedures for breakout analysis that can be implemented by a quality control employee. Each of the methods has advantages and disadvantages. The data recorded should be used to continuously control the production procedures and aid in finding room for improvement. If a database has been built up, it can be used for quick and precise troubleshooting should problems occur.
Fresh egg breakout
The quickest way to estimate the fertility in a breeder flock is a fresh egg breakout. The eggs can be cracked open just after lay or upon arrival at the hatchery. The disadvantages of this breakout method are the loss of valuable hatching eggs and possible errors of prediction due to the relatively small sample size (usually 100 eggs per flock). It is therefore recommended to limit the use of a fresh egg breakout to situations where a quick fertility check is required.
• Planning the first setting of eggs from a young flock.
• Problem flocks. Infertile and non-incubated fertile eggs can be differentiated quite precisely after some practical training. Guidelines and pictures can be found in the Hatchery Management Guide of LOHMANN TIERZUCHT, which is available upon request.
Candling breakout
The candling breakout analysis offers the highest accuracy in determining fertility. It is also useful in recording other sources of breeder flock or egg handling failures such as, early mortality, cracked eggs or eggs set upside down. It is therefore a good tool to monitor the week-to-week status of the breeder flocks.
Additionally, the candling percentage allows quite a precise prediction of the expected hatch of saleable chicks. As candling is usually done at days 9–10, there is time to react (e.g. rearrange settings, reschedule shipments and to detect causes and find solutions to the same) if a high number of clear eggs is observed. The size of the sample should be four to six trays of one flock (at least 600 eggs) from different locations inside one setter. This sampling procedure is not only important to avoid biased results caused by incubation conditions, but also by farm conditions. The eggs on subsequent trays might be of different quality than the average of one farm.
Hatch debris breakout
Most often performed in hatcheries is the breakout on hatch days which is also known as hatch debris breakout. Although it gives a full picture about the pattern of embryo mortality, infertile eggs and those containing early dead embryos are more difficult to distinguish. Another disadvantage is the time delay of usually four weeks (three weeks incubation + one week storage) between the date of lay and the breakout. A hatch debris breakout should be done every hatch day or just monthly in order to build up a database.
LOHMANN TIERZUCHT Hatchery
Management Guide
• To perform a hatch debris breakout, one should take out four to six hatcher baskets of one flock from different positions in one hatcher.
• Remove all unhatched eggs and place them on pulp trays.
• Record the number of dead chicks and culls left in the basket.
• Classify the unhatched eggs into appropriate categories, as Infertile, Early dead (day 1–7), Mid-dead (day 8–17), Late dead (>18), Pipped and Contaminated.
• Additionally, the eggshell should be assessed and cracked eggs also recorded.
As already mentioned, the differentiation between infertile eggs and very early dead birds is difficult as the blastodisc is often undetectable. One therefore needs to assess the appearance of the yolk and the albumen. If the egg still looks like a “table egg” on the day of hatch, it was most probably infertile. If you deal with very early dead germs, the colour of the yolk will change slightly, yolk membrane will weaken and the albumen will be thinner.
The content of eggs containing embryos which died during the second week of incubation will often appear black due to the breakdown of blood. Be careful not to classify these eggs as contaminated as long as they do not emit an odour. If breakouts are done regularly with an adequate sample size, the use of more categories (day 1–2, day 3–4, Malformation, Malposition, Internally pipped, Pipped alive vs. dead, etc.) can provide additional information, which might be overseen when using a more simple approach. All results from breakout analyses should be expressed as percentage of the eggs set, e.g. for three early dead chicks in a tray of 150 eggs, the result would be 2 %. The breakout data should be analysed using standards based on the results of the individual hatchery. From time to time, the standards should be compared to results achieved in other hatcheries. If you notice elevated percentages in single categories, have a look at the appendix of the LOHMANN TIERZUCHT Hatchery Management Guide where you will find a comprehensive list of probable causes. The Technical Service Team at LOHMANN TIERZUCHT is available to assist you with the set-up of a breakout routine and/or by the interpretation of the results.
Robert Schulte-Drüggelte
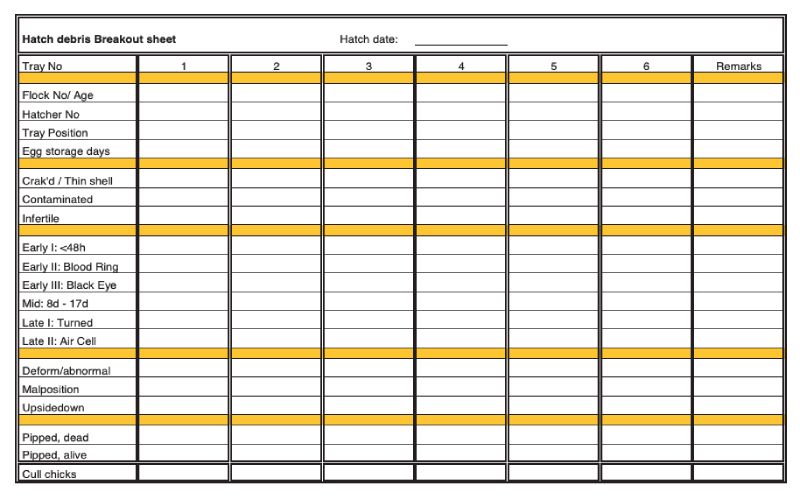
Example of a detailed hatch debris breakout sheet
Troubleshooting and breakout rules:
1. If a problem occurs, check the basic farm, transport and hatchery procedures first.
2. Collect breakout data regularly – also from good hatching flocks – to create your own database. Keep the records simple enough. You need to work with them.
3. Do not take action just because of the results of one breakout. Check the same flock again incubated in a different machine or vice-versa.
4. Assure good communication along the production chain, especially between the breeder farms and hatchery. This may not prevent problems, but significantly minimise their economic impact.
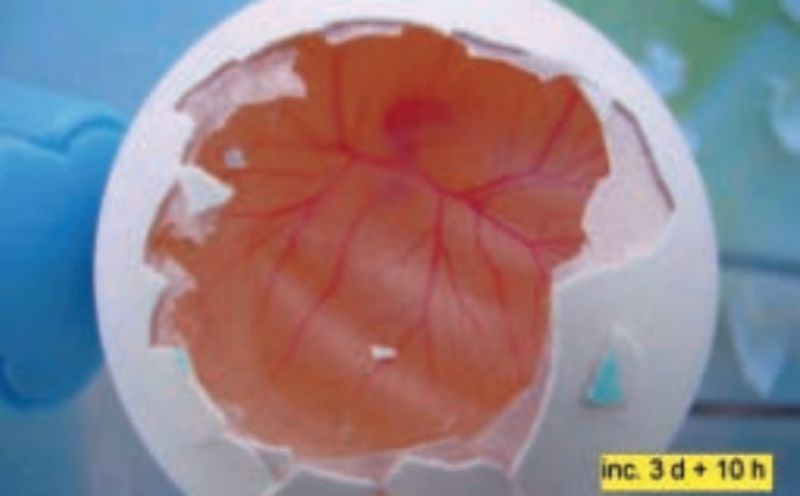
Embryonic development at day 3 + 10 hours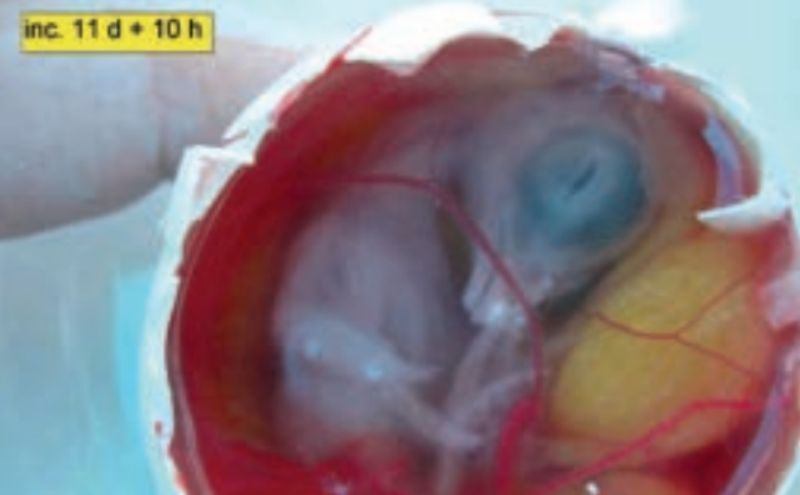
Embryonic development at day 11 + 10 hours

There are three different procedures for breakout analysis that can be implemented by a quality control employee. Each of the methods has advantages and disadvantages. The data recorded should be used to continuously control the production procedures and aid in finding room for improvement. If a database has been built up, it can be used for quick and precise troubleshooting should problems occur.
Fresh egg breakout
The quickest way to estimate the fertility in a breeder flock is a fresh egg breakout. The eggs can be cracked open just after lay or upon arrival at the hatchery. The disadvantages of this breakout method are the loss of valuable hatching eggs and possible errors of prediction due to the relatively small sample size (usually 100 eggs per flock). It is therefore recommended to limit the use of a fresh egg breakout to situations where a quick fertility check is required.
• Planning the first setting of eggs from a young flock.
• Problem flocks. Infertile and non-incubated fertile eggs can be differentiated quite precisely after some practical training. Guidelines and pictures can be found in the Hatchery Management Guide of LOHMANN TIERZUCHT, which is available upon request.
Candling breakout
The candling breakout analysis offers the highest accuracy in determining fertility. It is also useful in recording other sources of breeder flock or egg handling failures such as, early mortality, cracked eggs or eggs set upside down. It is therefore a good tool to monitor the week-to-week status of the breeder flocks.
Additionally, the candling percentage allows quite a precise prediction of the expected hatch of saleable chicks. As candling is usually done at days 9–10, there is time to react (e.g. rearrange settings, reschedule shipments and to detect causes and find solutions to the same) if a high number of clear eggs is observed. The size of the sample should be four to six trays of one flock (at least 600 eggs) from different locations inside one setter. This sampling procedure is not only important to avoid biased results caused by incubation conditions, but also by farm conditions. The eggs on subsequent trays might be of different quality than the average of one farm.
Hatch debris breakout
Most often performed in hatcheries is the breakout on hatch days which is also known as hatch debris breakout. Although it gives a full picture about the pattern of embryo mortality, infertile eggs and those containing early dead embryos are more difficult to distinguish. Another disadvantage is the time delay of usually four weeks (three weeks incubation + one week storage) between the date of lay and the breakout. A hatch debris breakout should be done every hatch day or just monthly in order to build up a database.
LOHMANN TIERZUCHT Hatchery
Management Guide
• To perform a hatch debris breakout, one should take out four to six hatcher baskets of one flock from different positions in one hatcher.
• Remove all unhatched eggs and place them on pulp trays.
• Record the number of dead chicks and culls left in the basket.
• Classify the unhatched eggs into appropriate categories, as Infertile, Early dead (day 1–7), Mid-dead (day 8–17), Late dead (>18), Pipped and Contaminated.
• Additionally, the eggshell should be assessed and cracked eggs also recorded.
As already mentioned, the differentiation between infertile eggs and very early dead birds is difficult as the blastodisc is often undetectable. One therefore needs to assess the appearance of the yolk and the albumen. If the egg still looks like a “table egg” on the day of hatch, it was most probably infertile. If you deal with very early dead germs, the colour of the yolk will change slightly, yolk membrane will weaken and the albumen will be thinner.
The content of eggs containing embryos which died during the second week of incubation will often appear black due to the breakdown of blood. Be careful not to classify these eggs as contaminated as long as they do not emit an odour. If breakouts are done regularly with an adequate sample size, the use of more categories (day 1–2, day 3–4, Malformation, Malposition, Internally pipped, Pipped alive vs. dead, etc.) can provide additional information, which might be overseen when using a more simple approach. All results from breakout analyses should be expressed as percentage of the eggs set, e.g. for three early dead chicks in a tray of 150 eggs, the result would be 2 %. The breakout data should be analysed using standards based on the results of the individual hatchery. From time to time, the standards should be compared to results achieved in other hatcheries. If you notice elevated percentages in single categories, have a look at the appendix of the LOHMANN TIERZUCHT Hatchery Management Guide where you will find a comprehensive list of probable causes. The Technical Service Team at LOHMANN TIERZUCHT is available to assist you with the set-up of a breakout routine and/or by the interpretation of the results.
Robert Schulte-Drüggelte
Example of a detailed hatch debris breakout sheet
Troubleshooting and breakout rules:
1. If a problem occurs, check the basic farm, transport and hatchery procedures first.
2. Collect breakout data regularly – also from good hatching flocks – to create your own database. Keep the records simple enough. You need to work with them.
3. Do not take action just because of the results of one breakout. Check the same flock again incubated in a different machine or vice-versa.
4. Assure good communication along the production chain, especially between the breeder farms and hatchery. This may not prevent problems, but significantly minimise their economic impact.
Embryonic development at day 3 + 10 hours
Embryonic development at day 11 + 10 hours